![[09] TDA4VH - emmc](https://img1.daumcdn.net/thumb/R750x0/?scode=mtistory2&fname=https%3A%2F%2Fblog.kakaocdn.net%2Fdn%2Fej4YYN%2FbtsLhoN6Z51%2FYy4IeMVy5ZjUSiQKnHIFbK%2Fimg.png)
테스트 환경
- Ubuntu 22.04
- J78S4XG01EVM
- J75S4XG01EVM Processor SDK Version 09_02_00_05
먼저 emmc로 부팅하기 위해서는 여러가지 방법이 있는데 그 중에서 USB 장치 펌웨어 업그레이드 즉 DFU를 통한 방법으로 진행한다. 우선 DFU 모드를 구성하기 위해 부팅 스위치를 구성해야 한다.
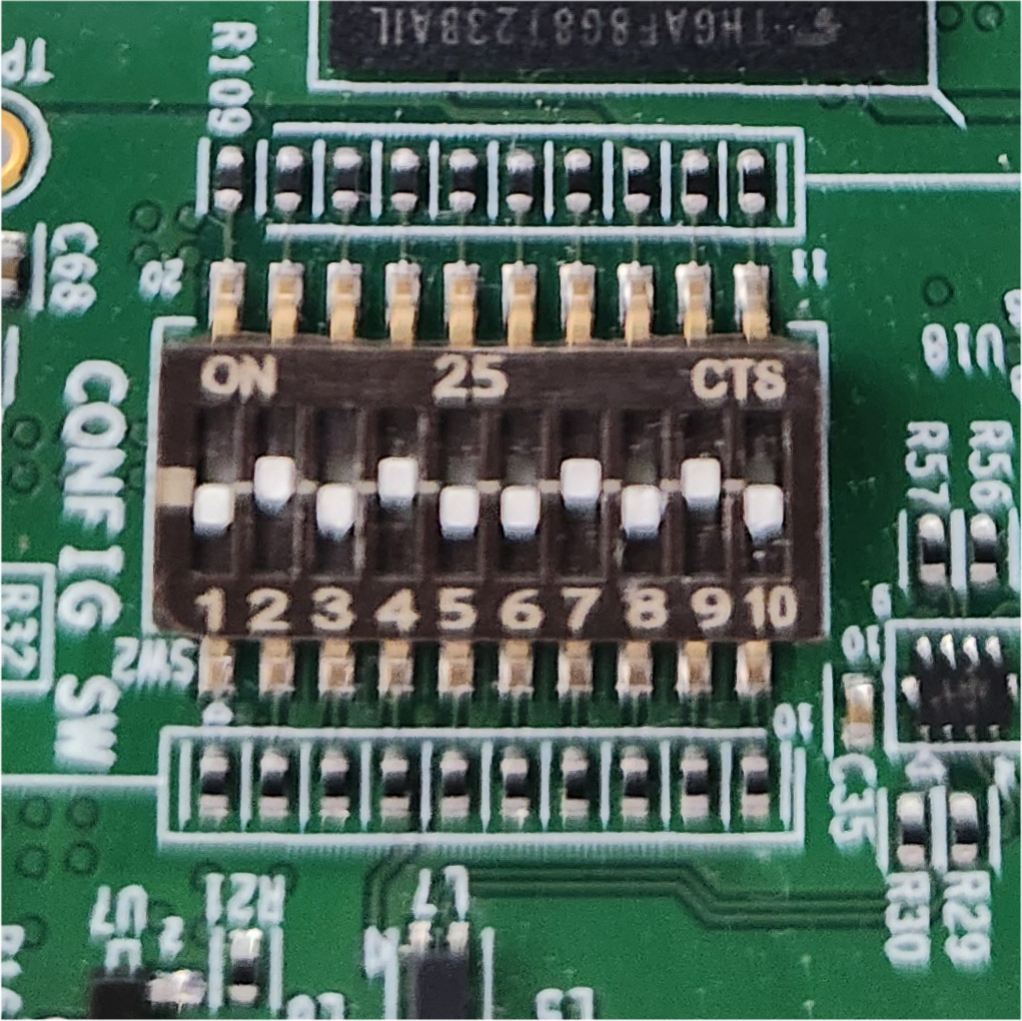
DFU 모드 부팅 스위치를 설정하려면 아래 이미지 확인한다.
SW11[1-8] = 1000 0000
SW7[1-8]  = 0010 0000
SW2[1-10] = 0101001010
USB 포트를 통해 보드에 전원이 공급되면 dmesg 명령어를 통해 USB 장치로 확인이 가능하다.
그 외에도 dfu-util을 사용하여 검색할 수 있습니다 .
*dfu-util이 설치되어 있지 않다면 아래 명령어로 설치한다
sudo apt install dfu-util장치가 정상 인식 되면 아래와 같은 명령어를 입력할 때 Found DFU 문구가 나온다.
$ sudo dfu-util -l
dfu-util 0.9

Copyright 2005-2009 Weston Schmidt, Harald Welte and OpenMoko Inc.
Copyright 2010-2016 Tormod Volden and Stefan Schmidt
This program is Free Software and has ABSOLUTELY NO WARRANTY
Please report bugs to http://sourceforge.net/p/dfu-util/tickets/

Found DFU: [0451:6165] ver=0200, devnum=55, cfg=1, intf=0, path="1-6.1", alt=1, name="SocId", serial="01.00.00.00"
Found DFU: [0451:6165] ver=0200, devnum=55, cfg=1, intf=0, path="1-6.1", alt=0, name="bootloader", serial="01.00.00.00"
dfu-util 0.9 에서는 대용량 사이즈 업데이트를 지원하지 않음 고로 0.11로 업데이트 필요 아래 사이트에서 다운 받아서 진행 기존 /bin 폴더에 dfu-util 0.9 파일을 0.11 파일로 변경한다.
https://sourceforge.net/projects/dfu-util/files/dfu-util-0.11-binaries.tar.xz
Download dfu-util-0.11-binaries.tar.xz (dfu-util)
JS7 JobScheduler is an open source workload automation solution. JS7 offers cross-platform job execution, managed file transfer, complex no-code job dependencies and a real REST API.
sourceforge.net
변경 후 확인
$ sudo dfu-util -V
dfu-util 0.11

Copyright 2005-2009 Weston Schmidt, Harald Welte and OpenMoko Inc.
Copyright 2010-2021 Tormod Volden and Stefan Schmidt
This program is Free Software and has ABSOLUTELY NO WARRANTY
Please report bugs to http://sourceforge.net/p/dfu-util/tickets/
진행 도중 아래 포럼 글을 참고하면 9.2 SDK에서 DFU가 제대로 진행되지 않는다는 글 확인
TDA4VH-Q1: DFU device can't detach - Processors forum - Processors - TI E2E support forums
e2e.ti.com
해결 방법은 10.0 SDK에서 진행하라고 함.
아래 링크를 통해 10.0 SDK 다운로드를 진행한다.
https://www.ti.com/tool/download/PROCESSOR-SDK-LINUX-J784S4
PROCESSOR-SDK-LINUX-J784S4 Software development kit (SDK) | TI.com
download ti-processor-sdk-linux-adas-j784s4-evm-10_00_00_08-Linux-x86-Install.bin — 2378590 K
www.ti.com
다운로드 받은 10.0 SDK 내부에 prebuilt-images 폴더로 들어가 DFU를 위한 tiboot3.bin, tispl.bin, u-boot.img 파일을 복사해 한 곳에 저장해둔다.
저장 위치에서 다음 명령을 사용하여 tiboot3.bin을 업로드
$ sudo dfu-util -R -a bootloader -D <path>tiboot3.bin
업로드 성공 시 다음 부팅 로그가 나오게 된다.
U-Boot SPL 2024.04-dirty (Dec 11 2024 - 15:38:51 +0900)
SYSFW ABI: 4.0 (firmware rev 0x000a '10.0.8--v10.00.08 (Fiery Fox)')
Initialized 4 DRAM controllers
SPL initial stack usage: 13456 bytes
Trying to boot from DFU
그 다음 tispl.bin 및 u-boot.img 파일을 업로드 진행
먼저 부트로더가 파일을 업로드할 수 있는 두 개의 새로운 섹션을 제공했는지 확인할 수 있다.
$ sudo dfu-util -l
dfu-util 0.9

Found DFU: [0451:6165] ver=0223, devnum=71, cfg=1, intf=0, path="1-6.1", alt=1, name="u-boot.img", serial="UNKNOWN"
Found DFU: [0451:6165] ver=0223, devnum=71, cfg=1, intf=0, path="1-6.1", alt=0, name="tispl.bin", serial="UNKNOWN"
아래 단계를 수행하여 파일을 업로드 진행
$ sudo dfu-util -R -a tispl.bin -D <path>/tispl.bin
$ sudo dfu-util -R -a u-boot.img -D <path>u-boot.img
이제 U-Boot가 시작된다.
U-Boot SPL 2024.04-dirty (Dec 11 2024 - 15:38:51 +0900)
SYSFW ABI: 4.0 (firmware rev 0x000a '10.0.8--v10.00.08 (Fiery Fox)')
Initialized 4 DRAM controllers
SPL initial stack usage: 13456 bytes
Trying to boot from DFU
#####DOWNLOAD ... OK
Ctrl+C to exit ...
Warning: Detected image signing certificate on GP device. Skipping certificate to prevent boot failure. This will fail if the image was also encrypted
Warning: Detected image signing certificate on GP device. Skipping certificate to prevent boot failure. This will fail if the image was also encrypted
Warning: Detected image signing certificate on GP device. Skipping certificate to prevent boot failure. This will fail if the image was also encrypted
Warning: Detected image signing certificate on GP device. Skipping certificate to prevent boot failure. This will fail if the image was also encrypted
Warning: Detected image signing certificate on GP device. Skipping certificate to prevent boot failure. This will fail if the image was also encrypted
Loading Environment from nowhere... OK
init_env from device 18 not supported!
Starting ATF on ARM64 core...

NOTICE:  BL31: v2.10.0(release):v2.10.0-367-g00f1ec6b87-dirty
NOTICE:  BL31: Built : 16:09:05, Feb  9 2024
I/TC:
I/TC: OP-TEE version: 4.2.0-dev (gcc version 13.3.0 (GCC)) #1 Fri Apr 12 09:51:21 UTC 2024 aarch64
I/TC: WARNING: This OP-TEE configuration might be insecure!
I/TC: WARNING: Please check https://optee.readthedocs.io/en/latest/architecture/porting_guidelines.html
I/TC: Primary CPU initializing
I/TC: GIC redistributor base address not provided
I/TC: Assuming default GIC group status and modifier
I/TC: SYSFW ABI: 4.0 (firmware rev 0x000a '10.0.8--v10.00.08 (Fiery Fox)')
I/TC: HUK Initialized
I/TC: Activated SA2UL device
I/TC: Fixing SA2UL firewall owner for GP device
I/TC: Enabled firewalls for SA2UL TRNG device
I/TC: SA2UL TRNG initialized
I/TC: SA2UL Drivers initialized
I/TC: Primary CPU switching to normal world boot

U-Boot SPL 2024.04-dirty (Dec 11 2024 - 15:38:45 +0900)
SYSFW ABI: 4.0 (firmware rev 0x000a '10.0.8--v10.00.08 (Fiery Fox)')
Trying to boot from DFU
cdns-usb3-peripheral usb@6000000: DRD version v1 (ID: 0004024e, rev: 00000200)
cdns-usb3-peripheral usb@6000000: Initialized  ep0 support:
cdns-usb3-peripheral usb@6000000: Initialized  ep1out support: BULK, INT ISO
cdns-usb3-peripheral usb@6000000: Initialized  ep2out support: BULK, INT ISO
cdns-usb3-peripheral usb@6000000: Initialized  ep3out support: BULK, INT ISO
cdns-usb3-peripheral usb@6000000: Initialized  ep4out support: BULK, INT ISO
cdns-usb3-peripheral usb@6000000: Initialized  ep5out support: BULK, INT ISO
cdns-usb3-peripheral usb@6000000: Initialized  ep6out support: BULK, INT ISO
cdns-usb3-peripheral usb@6000000: Initialized  ep7out support: BULK, INT ISO
cdns-usb3-peripheral usb@6000000: Initialized  ep8out support: BULK, INT ISO
cdns-usb3-peripheral usb@6000000: Initialized  ep9out support: BULK, INT ISO
cdns-usb3-peripheral usb@6000000: Initialized  ep10out support: BULK, INT ISO
cdns-usb3-peripheral usb@6000000: Initialized  ep11out support: BULK, INT ISO
cdns-usb3-peripheral usb@6000000: Initialized  ep12out support: BULK, INT ISO
cdns-usb3-peripheral usb@6000000: Initialized  ep13out support: BULK, INT ISO
cdns-usb3-peripheral usb@6000000: Initialized  ep14out support: BULK, INT ISO
cdns-usb3-peripheral usb@6000000: Initialized  ep15out support: BULK, INT ISO
cdns-usb3-peripheral usb@6000000: Initialized  ep1in support: BULK, INT ISO
cdns-usb3-peripheral usb@6000000: Initialized  ep2in support: BULK, INT ISO
cdns-usb3-peripheral usb@6000000: Initialized  ep3in support: BULK, INT ISO
cdns-usb3-peripheral usb@6000000: Initialized  ep4in support: BULK, INT ISO
cdns-usb3-peripheral usb@6000000: Initialized  ep5in support: BULK, INT ISO
cdns-usb3-peripheral usb@6000000: Initialized  ep6in support: BULK, INT ISO
cdns-usb3-peripheral usb@6000000: Initialized  ep7in support: BULK, INT ISO
cdns-usb3-peripheral usb@6000000: Initialized  ep8in support: BULK, INT ISO
cdns-usb3-peripheral usb@6000000: Initialized  ep9in support: BULK, INT ISO
cdns-usb3-peripheral usb@6000000: Initialized  ep10in support: BULK, INT ISO
cdns-usb3-peripheral usb@6000000: Initialized  ep11in support: BULK, INT ISO
cdns-usb3-peripheral usb@6000000: Initialized  ep12in support: BULK, INT ISO
cdns-usb3-peripheral usb@6000000: Initialized  ep13in support: BULK, INT ISO
cdns-usb3-peripheral usb@6000000: Initialized  ep14in support: BULK, INT ISO
cdns-usb3-peripheral usb@6000000: Initialized  ep15in support: BULK, INT ISO
#####DOWNLOAD ... OK
Ctrl+C to exit ...
Warning: Detected image signing certificate on GP device. Skipping certificate to prevent boot failure. This will fail if the image was also encrypted
Warning: Detected image signing certificate on GP device. Skipping certificate to prevent boot failure. This will fail if the image was also encrypted


U-Boot 2024.04-dirty (Dec 11 2024 - 15:38:45 +0900)

SoC:   J784S4 SR1.0 GP
Model: Texas Instruments J784S4 EVM
DRAM:  2 GiB (effective 32 GiB)
Core:  145 devices, 35 uclasses, devicetree: separate
Flash: spi_nand nand@0: unknown raw ID e0 00 00 00
0 Bytes
MMC:   mmc@4f80000: 0, mmc@4fb0000: 1
Loading Environment from nowhere... OK
In:    serial@2880000
Out:   serial@2880000
Err:   serial@2880000
am65_cpsw_nuss ethernet@46000000: K3 CPSW: nuss_ver: 0x6BA02102 cpsw_ver: 0x6BA82102 ale_ver: 0x00293904 Ports:1
Net:   eth0: ethernet@46000000port@1
Hit any key to stop autoboot:  0
U-Boot에서는 파티션을 ext4로 포맷이 불가능 하기 때문에 커널로 부팅하고 ext4로 포맷한 후 파티션에 rootfs를 써야 함 사용자 PC에서 파일을 준비한다.
tisdk-adas-image-j784s4-evm.tar.xz를 사용하여 <rootfs.ext4>를 준비
$ cd <path-ti-psdk>/filesystem
$ dd if=/dev/null of=tisdk-base.ext4 bs=1M seek=7000
$ mkfs.ext4 -F tisdk-base.ext4
$ mkdir mnt_fs
$ sudo mount -t ext4 tisdk-base.ext4 mnt_fs
$ cd mnt_fs
$ sudo tar xvf ../tisdk-adas-image-j784s4-evm.tar.xz
$ cd ..
$ sudo umount mnt_fs
파티션 테이블을 만들기 위해서 U-Boot 상에 gpt 명령을 사용하여 수행이 가능하다.
그렇게 하려면 아래 명령어 실행
=> gpt write mmc 0 $partitions
다음 명령을 사용하여 파티션 테이블을 검사할 수도 있다.
=> mmc part

Partition Map for MMC device 0  --   Partition Type: EFI

Part    Start LBA       End LBA         Name
        Attributes
        Type GUID
        Partition GUID
  1     0x00001000      0x03b47fde      "rootfs"
        attrs:  0x0000000000000000
        type:   ebd0a0a2-b9e5-4433-87c0-68b6b72699c7
        guid:   d2100992-4658-47c2-b09c-682824ad4aee
이제 아래 명령어를 통해 U-Boot에서 DFU 모드를 활성화하고 dfu-util을 사용하여 필요한 모든 파일을 업로드할 수 있다.
여기서 업로드 하는 파일은 9.2 SDK에 있는 파일입니다.
아래 이슈에 따르면 SDK에 나와 있는 문서와 실제 펌웨어의 파일 크기(offset)가 다른 것으로 판단된다.
TDA4AH-Q1: J784S4 EVM: eMMC boot failure - Processors forum - Processors - TI E2E support forums
e2e.ti.com
해당 문제를 해결 하기 위해서 u-boot 상에서 파일 offset을 재설정 한다.
=> setenv dfu_alt_info_emmc 'rawemmc raw 0 0x800000 mmcpart 1;rootfs part 0 1;tiboot3.bin.raw raw 0x0 0x800 mmcpart 1;tispl.bin.raw raw 0x800 0x1000 mmcpart 1;u-boot.img.raw raw 0x1800 0x2000 mmcpart 1'해당 정보를 dfu_alt_info에 설정하기 위해 보드에서 아래 명령어 입력
=> setenv dfu_alt_info ${dfu_alt_info_emmc}
=> dfu 0 mmc 0
다시 PC로 돌아와서 파일 위치에서 아래 명령어 실행
$ sudo dfu-util -a tiboot3.bin.raw -D <path>/tiboot3/bin

$ sudo dfu-util -a tispl.bin.raw -D <path>/tispl.bin
$ sudo dfu-util -a u-boot.img.raw -D <path>/u-boot.img
$ sudo dfu-util -R -a rootfs -D <path>/rootfs.ext4
모든 파일을 성공적으로 업로드한 후 rootfs의 내용을 확인하여 rootfs가 채워졌는지 확인할 수 있다.
=> ls mmc 0
<DIR>       4096 .
<DIR>       4096 ..
<DIR>      16384 lost+found
<SYM>          7 bin
<DIR>       4096 boot
<DIR>       4096 dev
...
마지막으로 eMMC에서 부팅하도록 U-Boot를 구성
=> setenv mmcdev 0
=> setenv bootpart 0
=> mmc partconf 0 1 1 1
=> mmc bootbus 0 2 0 0
이제 부팅 명령을 실행할 수 있으며 U-Boot는 eMMC에서 Linux 커널을 로드하여 운영 체제를 시작하기 위해서는eMMC 부팅을 위해 아래와 같이 부팅 스위치를 구성해야 eMMC에서 보드를 시작할 수 있다.
SW11[1-8] = 1000 0000
SW7[1-8]  = 0100 0000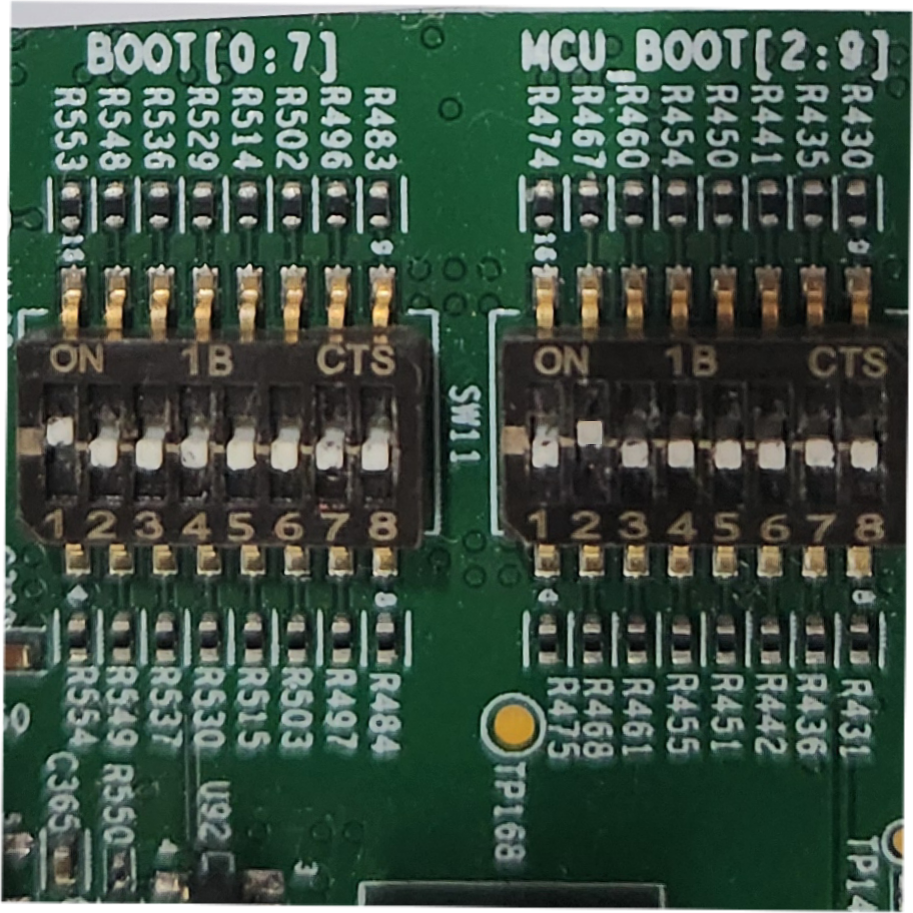
[  OK  ] Started Weston, a Wayland …mpositor, as a system service.
[  OK  ] Finished Print notice about GPLv3 packages.
[  OK  ] Reached target Multi-User System.
[  OK  ] Reached target Graphical Interface.
         Starting Record Runlevel Change in UTMP...
[  OK  ] Finished Record Runlevel Change in UTMP.

 _____                    _____           _         _
|  _  |___ ___ ___ ___   |  _  |___ ___  |_|___ ___| |_
|     |  _| .'| . | . |  |   __|  _| . | | | -_|  _|  _|
|__|__|_| |__,|_  |___|  |__|  |_| |___|_| |___|___|_|
              |___|                    |___|

Arago Project j784s4-evm -

Arago 2023.10 j784s4-evm -

j784s4-evm login:
참고 :
3.1.1.2. USB Device Firmware Upgrade (DFU) — Processor SDK Linux for J784s4 Documentation
Processor SDK Linux for J784s4 3.1.1.2. USB Device Firmware Upgrade (DFU) When working with USB Device Firmware Upgrade (DFU), regardless of the medium to be written to and of the board being used, there are some general things to keep in mind. First of al
software-dl.ti.com
'TI > TDA4VH' 카테고리의 다른 글
| [09] TDA4VH - mcu_i2c0 활성화 (0) | 2024.12.16 |
|---|---|
| [TDA4VH] USB 3.0 lane 변경 (1) | 2024.11.16 |
| [09] TDA4VH-Q1 - SDCard 이미지 만들기 (0) | 2024.03.17 |
| [09] TDA4VH-Q1 Processor SDK (0) | 2024.03.13 |